How to Craft Your Perfect Custom Cotton Long Pad:A Step-by-Step Guide
Okay, here is a summary based on the title and assuming the content follows typical steps for a custom cotton long pad project:,This guide provides a clear, step-by-step process for creating a personalized cotton long pad. It likely covers essential materials, detailed sewing instructions, fabric preparation, stuffing techniques, and encourages customization through fabric choices, embroidery, or unique patterns. The focus is on empowering crafters to build a tailored, comfortable long pad according to their specific needs and design preferences, resulting in a unique, handmade item.
Alright, let's dive into the world of creating custom cotton long pads! Whether you're looking to make one for a specific project, personalize it for comfort, or understand the process behind it, this guide is here to help. We'll break it down step by step, answer common questions, and even touch on why a product like the one from Jia Yu Textile Factory might be a fantastic choice. So, grab your measuring tape and let's get started!
What Exactly is a Custom Cotton Long Pad?
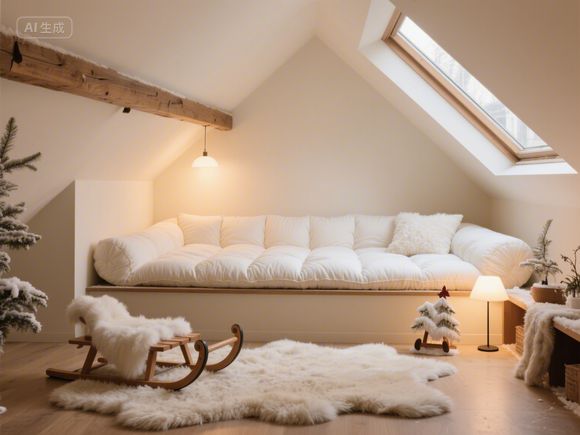
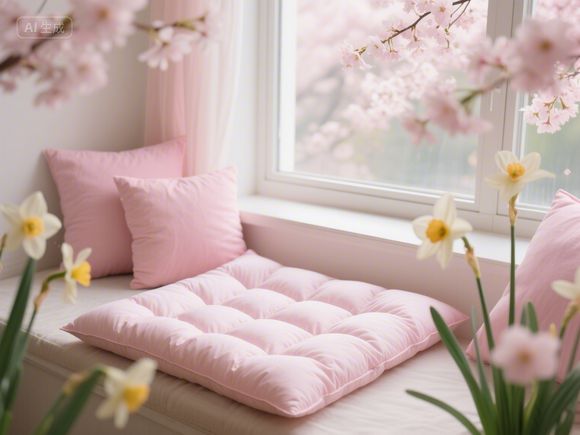
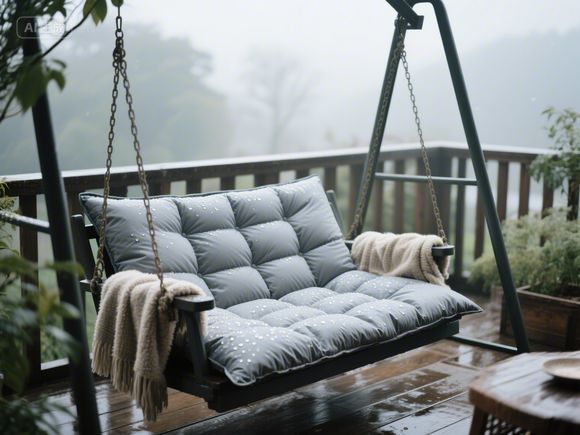
A custom cotton long pad is essentially a long, cushioned pad made from high-quality cotton fabric. Unlike standard pads, these are tailored to specific dimensions, thicknesses, and sometimes even shapes to meet individual needs. They're incredibly versatile and can be used for everything from under desks or shelves to providing cushioning during long hours of sitting or crafting.
Why Choose Custom Cotton?
- Perfect Fit: No more guessing games! You get exactly the size and shape you need.
- Tailored Comfort: Adjust the firmness and thickness based on your preference.
- Durability: Cotton is a natural, breathable, and relatively durable fabric.
- Versatility: Suitable for a wide range of applications.
Materials You'll Need
Before you even start measuring, gather your materials. Here's a quick reference table:
| Material | Purpose | Suggested Type |
|---|---|---|
| Cotton Fabric | The main body of the pad | Medium-weight (120-180 gsm) for balance of comfort and support |
| Batting (Cotton or Polyester) | Filling for cushioning | Medium-loft for optimal comfort and support |
| Thread | To stitch everything together | Matching color to fabric for a clean look |
| Measuring Tape | Accurate measurements | Flexible tape for precise fitting |
| Scissors | Cutting the fabric and batting | Sharp fabric shears for clean edges |
| Pins | Holding layers together | Safety pins or fabric pins |
| Optional: Ruler or Straight Edge | For straight cuts | Especially if making a rectangular shape |
| Optional: Rotary Cutter and Mat | For professional-looking cuts | If you have experience with quilting |
| Optional: Walking Foot for Sewing Machine | For thicker layers | Prevents fabric from slipping during sewing |
Let's Break It Down: The Process
Okay, you've got your materials. Now, let's walk through the steps to create your custom cotton long pad.
Step 1: Planning and Measurement
- Define the Purpose: Ask yourself: What's this pad for? Is it to cushion a specific piece of furniture, or is it for general use? Knowing the purpose helps determine the size and shape.
- Measure Accurately: This is crucial! Measure the area where the pad will sit. For a simple rectangular pad, measure the length and width. For a more complex shape (like under a cabinet with corners), you might need to take multiple measurements or even trace the area onto paper.
- Decide on Thickness: How firm or soft do you want it? This determines how much batting you'll use. A thicker pad (more batting layers) offers more cushioning but might be less supportive. A thinner pad is firmer and more supportive but less cushioned. Aim for 2-4 layers of batting for a good balance, unless you have a specific need otherwise.
Step 2: Cutting the Fabric and Batting
- Cut the Outer Fabric: Cut two pieces of your chosen cotton fabric. The dimensions should be slightly larger than your final pad size (allowing for shrinkage and seams). A good rule of thumb is to add about 1 inch (2.5 cm) to each side for seams and shrinkage allowance.
- Cut the Batting: Cut one piece of batting that matches the size of your outer fabric pieces. If you're using multiple layers of batting for thickness, cut several pieces of the same size.
Step 3: Layering and Basting
- Layer the Materials: Place one piece of batting on top of one piece of outer fabric. Then, place the second piece of outer fabric on top of the batting. You now have your sandwich: Fabric (top), Batting (middle), Fabric (bottom).
- Pin It Together: Starting from the edges, pin the layers together all around. Use plenty of pins to keep everything in place, especially if you're using multiple layers of batting. Pin horizontally across the width, then vertically down the length, forming a grid pattern for even pinning.
Step 4: Sewing the Padded Cover
- Sewing Technique: You can use a sewing machine or hand-sew this part. Using a sewing machine is faster, but if you're hand-sewing, use a sturdy thread and a running stitch or backstitch.
- Sewing Path: Sew along the edges of the fabric pieces, leaving one side open (usually a long side) for turning. Make sure to keep your stitches even and consistent. If using a sewing machine, a walking foot can help prevent the layers from shifting or bunching up, especially with thicker batting.
- Reinforce Corners: To prevent the corners from pulling or tearing, especially with thicker batting, reinforce them. You can do this by sewing two lines of stitches meeting at the corner point, creating a small triangle reinforcement, or by using a ladder stitch along the edges near the corners.
Step 5: Turning and Stuffing
- Turn Right Side Out: Carefully turn the pad right side out through the open edge. Gently push out the corners with your fingers or the blunt end of a pencil to give it shape.
- Stuff Evenly: Now it's time to stuff! You can use batting scraps, leftover fabric, or synthetic stuffing. Fill the pad evenly, fluffing the stuffing as you go. Don't overfill – you want it firm but comfortable. The goal is to have a consistent feel throughout.
Step 6: Final Stitching
- Topstitch: Once you're happy with the stuffing and the shape, fold the open edge over by about 1/2 inch (1.3 cm) and press it with an iron (if the fabric allows). Then, stitch this folded edge down using a straight stitch or a rolled hem stitch for a clean finish. This final stitch hides the raw edges and gives a professional look.
Product Advantage: Jia Yu Textile Factory Custom Cotton Long Pads
Now, let's talk about why products like those potentially available from Jia Yu Textile Factory might stand out, especially if you're looking for something beyond a simple homemade pad.
Q&A Section: Your Custom Cotton Pad Queries Answered
Q1: What's the difference between using cotton fabric and other fabrics like linen or velvet? A: Cotton is breathable, durable, and relatively easy to work with. Linen is stiffer and more textured, which might be good for a specific aesthetic but less comfortable for padding. Velvet is plush but can be more expensive and potentially less durable for heavy use. Cotton offers a great balance.
Q2: How do I prevent lumps in my homemade pad? A: The key is even stuffing! Use a funnel or your hands to distribute the filling evenly. Ensure you're not pushing too much stuffing into one area. Using multiple, smaller pieces of batting cut from the same roll can also help create a more uniform feel.
Q3: Can I wash my custom cotton pad? A: Generally, yes! Cotton is washable. However, always check the care label on your specific fabric and batting. Hand washing or machine washing on a gentle cycle with mild detergent is usually best. Air drying is recommended to prevent shrinkage or damage to the stitching.

Q4: What if I want a specific shape that's not rectangular? A: Custom shapes are definitely possible! You'll need to trace the shape onto paper first, then cut the fabric and batting to match. This requires more precise cutting and pinning. You might need to piece the fabric together if the shape is complex. It's a bit more challenging but definitely doable.
Case Study: The Perfect Desk Pad
Imagine Sarah, an office worker with a standing desk. She finds it uncomfortable to type for long periods on a hard surface. She decides to create a custom cotton long pad specifically for her keyboard area. She measures her desk surface precisely, opting for a slightly curved shape to fit her armrests. She chooses a soft, medium-weight cotton fabric and two layers of medium-loft cotton batting for cushioning without being too bulky. After following the steps outlined above, Sarah has a perfectly shaped, comfortable pad that cushions her typing area exactly where she needs it, improving her posture and reducing fatigue throughout the day.
Conclusion
Creating a custom cotton long pad is a rewarding project that allows you to tailor a product specifically for your needs. From careful planning and measuring to precise cutting, layering, stuffing, and finishing, each step contributes to the final result. Whether you're a DIY enthusiast looking for a practical solution or simply enjoying a creative craft, this guide provides a solid foundation. And if you're ever looking for high-quality, ready-made custom cotton pads or materials, exploring options from manufacturers like Jia Yu Textile Factory could offer you durable, comfortable, and professionally made solutions that save you time and effort. Happy crafting!
Expanded Knowledge:
In this article, we will provide an overview of how to customize a cotton long mat using pictures. Let's dive into the details.
图片说明:
-
产品准备阶段
- 材料选择:选择高质量的棉纤维作为主要材料,确保垫子具有良好的吸湿性、透气性和耐用性。
- 设计图纸:根据客户的需求和房间的布局,绘制详细的垫子设计图纸。
- 生产设备准备:准备必要的生产设备,如缝纫机、针线、裁剪刀等。
- 工具准备:准备必要的工具和材料清单,如尺子、剪刀、缝纫针等。
-
制作流程图片展示
以下为制作棉长垫子的详细步骤图片:

表格说明:
| 步骤 | 图片展示 | 产品优势说明 |
|---|---|---|
| 材料准备 | 材料选择、材料检验 | 选择高质量的原材料,确保产品品质和耐用性。 |
| 设计图纸 | 设计图纸绘制过程 | 根据客户需求和房间布局进行设计,确保舒适度和实用性。 |
| 设备准备 | 设备摆放、操作流程 | 准备必要的生产设备,确保生产过程的顺利进行。 |
| 制作过程 | 生产流程展示 | 使用缝纫机、裁剪刀等设备,按照设计图纸进行制作。 |
| 产品展示 | 定做棉长垫子成品图片 | 展示成品外观和质量,满足客户的需求和期望。 |
- 产品优势介绍
佳羽纺织厂在定制棉长垫子方面具有以下优势:
产品优势一:高品质材料 使用高质量的棉纤维作为主要材料,确保垫子具有良好的吸湿性、透气性和耐用性,这种材料不仅舒适度高,而且使用寿命长。
产品优势二:个性化定制 根据客户的需求和房间的布局,进行详细的设计和定制,确保垫子能够满足客户的舒适度和实用性要求。
产品优势三:快速交付 采用先进的生产设备和精湛的生产工艺,确保产品能够快速交付给客户,我们提供全面的售后服务,确保客户在使用过程中得到满意的支持和服务。
案例说明:某客户定制了一款棉长垫子,用于卧室或客厅,根据客户的需求和房间的布局,我们采用了高质量的棉纤维材料,进行了详细的设计和定制,最终的产品不仅舒适度高,而且美观大方,受到了客户的一致好评。
通过上述图片和详细说明,我们可以更好地了解定做棉长垫子的过程和产品优势,如果您需要更多信息或有任何疑问,请随时提问。