Crafting Your Cozy Corner:A Step-by-Step Guide to Making Custom Thick Sofa Pads
This guide provides a detailed, step-by-step process for creating custom, thick cushion pads for sofas. Learn how to select appropriate fabric, measure accurately, cut, and sew plush padding covers to transform your seating into a cozier, more personalized haven. Perfect for DIY enthusiasts looking to enhance comfort and style affordably.
本文目录导读:
- II. 产品制作流程说明
- 材料选择
- 设计规划
- 手工制作
- 质量检测
- III. 产品优势介绍
- 产品优势一:优质材料选择
- 产品优势二:个性化定制服务
- 产品优势三:精湛工艺和精湛技术
- IV. 案例说明
- 案例一:客户需求分析
- V. 问答环节(问答式补充说明)
Okay, here's a conversational English guide on making custom thick sofa cushions, incorporating the requested elements.

Alright, let's talk about those dreamy, plush sofa cushions you see in magazines or maybe just wish you had at home. You know the ones – they look so comfortable, inviting you to sink right into them. Maybe your old cushions are wearing thin, or perhaps you're just tired of the standard lumpy feel. Whatever the reason, making your own custom thick sofa pads can be a fantastic project! It’s satisfying, cost-effective (often), and lets you tailor the comfort exactly to your liking. Plus, there's a certain pride in creating something cozy for your own space. So, grab a cup of coffee (or tea!), get comfy, and let's dive into how you can make your own custom thick sofa cushions.
Why Bother Making Your Own?
Before we jump into the 'how-to', let's quickly cover the 'why'. Making your own cushions offers a few key advantages:
- Ultimate Customization: You control the size, thickness, filling, and fabric – everything! Want a specific pattern? Got it. Need extra padding for a certain spot? Easy. Love a particular texture? Choose it.
- Cost-Effectiveness: While fabric and filling have costs, buying materials in smaller quantities for just the cushions you need can often be cheaper than buying pre-made, custom-sized cushions from a furniture store.
- Quality Control: You get to choose high-quality materials. No hidden compromises!
- Personal Satisfaction: There's something uniquely rewarding about creating something functional and beautiful for your home.
What You'll Need: Gathering Your Materials & Tools
Just like baking a cake, you need the right ingredients and tools. Let's break it down:
Materials
- Fabric: This is your canvas. Think about the feel, the look, and the care instructions.
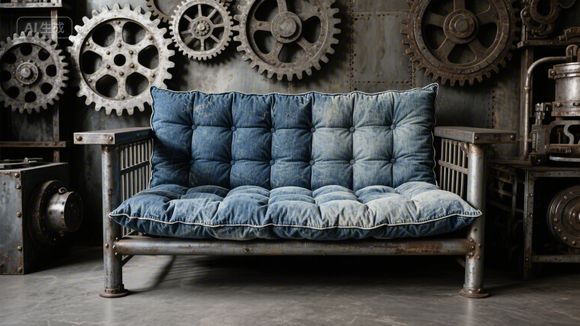
- Weight & Weave: For thick pads, you'll want a sturdy fabric. Denim, canvas, tweed, corduroy, and even some thicker cotton blends or velvets work well. Avoid very lightweight fabrics like chiffon or thin jersey.
- Texture: Consider how you want the cushion to feel. Velvet is luxurious, faux fur is soft, linen is crisp. Corduroy and tweed offer a more structured feel.
- Care: Match the fabric care to your lifestyle. Does it need dry cleaning? Can it be machine washed and dried? Polyester blends often hold up well in washing machines.
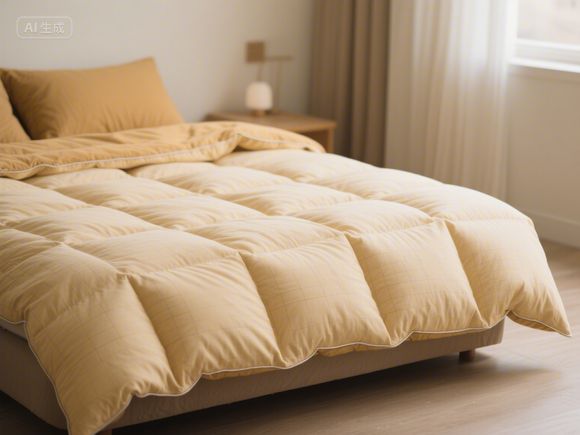
- Filling: This is the heart of the cushion's thickness and comfort.
- Foam: Polyester or memory foam offers great shape retention and support. It comes in different densities (higher density = firmer, longer lasting). Fibrefill (like polyester batting) is fluffier but less supportive and can flatten faster. You can mix both for a balance of support and softness.
- Down/Feathers: Natural, very soft, and excellent for fluffiness. They can flatten quickly if not properly cared for and might be messy if the cushion gets dirty. Often requires dry cleaning.
- Synthetic Blends: Often used in upholstery, these can offer good support and durability.
- Sewing Thread: Strong polyester or nylon thread is best for durability. Use a thicker thread for extra reinforcement, especially if using heavy fabrics or dense filling.
- Stuffing Tubes or Funnel: Essential for getting the filling into the cushion cover without a mess.
- Measuring Tape: Accurate measurements are key!
- Scissors: Sharp fabric shears are a must for clean cuts.
- Pins: Safety pins, all-purpose pins, or cushion pins (which hold fabric together without leaving holes) are useful for basting and holding layers in place.
- Sewing Machine: Your trusty machine will do most of the work. Get good needles for fabric (usually size 80/12 or 90/14 universal, or 100/16 for thicker fabrics/foam).
- Rotary Cutter & Cutting Mat (Optional but Recommended): Especially useful if you're cutting large amounts of fabric or foam.
- Foam Knife or Box Cutter: For trimming foam shapes.
- Pillow Formers (Optional): These are pre-shaped bags filled with foam or fibrefill. They can simplify the process, especially for standard shapes, but might limit your custom thickness options.
- Button Sewing Kit (Optional but Recommended for Buttoned Covers): Includes a button, needle, thread, and sometimes a buttonhole maker.
- Zipper (Optional but Recommended for Zippered Covers): Allows for easy removal of the filling for cleaning or fluffing.
Let's Compare Some Common Filling Options
| Filling Type | Pros | Cons | Best For |
|---|---|---|---|
| Polyester Foam | Good shape retention, durable, wide variety of densities | Can be expensive, less breathable, some types may off-gas initially | General use, areas needing good support |
| Memory Foam | Excellent contouring and support, retains shape well | Can feel warmer, may have initial odor, less "bouncy" | Back support, specific seating areas |
| Polyester Fibrefill | Lightweight, soft, inexpensive, readily available | Flattens easily, poor shape retention, less supportive | Decorative cushions, areas needing softness |
| Down/Feathers | Naturally soft, excellent loft (fluffiness), lightweight | Can flatten quickly, messy if damaged, expensive, often requires dry cleaning | Luxury applications, decorative use |
| Synthetic Blends | Often more durable than pure fibrefill, good support | May not be as soft as down, can sometimes flatten | Upholstery, high-use areas |
Let's Address Some Common Questions
Q: How thick should my custom cushions be? A: It really depends on your preference and the sofa's design. Standard cushions might be 4-6 inches. For extra plushness, aim for 6-8 inches or more. Consider the existing cushions on your sofa – you want a good match. If you have a deep-seated sofa, thicker pads might sink more. Start with a sample!
Q: What fabric is best for durability? A: Fabrics like denim, canvas, tweed, and high-quality cotton or linen blends are generally very durable. Polyester and nylon blends are also excellent for wear resistance. Avoid very sheer or delicate fabrics unless they are backed with a sturdier material.
Q: How do I ensure my cushion stays looking good? A: Proper care is key. Follow the fabric care instructions! Many upholstery fabrics can be spot cleaned or machine washed with care. Using pillow protectors can also help keep the filling clean. Fluff the cushion regularly to maintain its shape.
The Step-by-Step Process: From Pattern to Plush Perfection
Okay, let's get hands-on! Here’s a general guide. Remember to adapt this based on your specific cushion shape (circular, rectangular, oval, etc.) and whether you're using a single piece of fabric, a pillow former, or cutting your own fabric.
Step 1: Planning & Preparation
- Measure Accurately: Measure the cushion area on your sofa precisely. Don't just copy an old cushion! Measure the length, width, and desired thickness. Also, measure the depth of the cushion insert or the space it needs to fit.
- Choose Your Pattern: Decide on the shape. Most cushions are simple circles or rectangles/ovals. For more complex shapes, you might need to piece the fabric or use a template.
- Pattern Creation (If needed): If cutting fabric, create a pattern. Trace the shape onto paper, then cut out the pieces. Remember to add seam allowances (usually 1/2 inch or 1.3 cm) to each piece. For a rectangular cushion, you'll typically need two identical pieces (front and back). For a circular cushion, you'll need an outer piece and an inner piece (unless using a single layer with a slit for filling).
- Gather Materials: Lay out your chosen fabric, filling, thread, pins, and sewing machine. Have your stuffing tube ready!
Step 2: Cutting the Fabric
- Lay It Flat: Place your pattern piece on the fabric, right side together (unless you're using a single layer for a slit method).
- Pin It Down: Secure the pattern with pins to avoid shifting.
- Cut Carefully: Use sharp fabric shears to cut along the pattern edge. Cut slowly and smoothly for clean edges.
- Repeat: Cut all necessary pieces according to your pattern. For a rectangular cushion, cut two identical pieces. For a slit method, cut one piece with a slit cut along the center (about 1/2 inch deep) for filling insertion.
Step 3: Preparing the Filling
- Measure Filling: Calculate how much filling you need. A good rule of thumb is about 1.5 lbs (0.68 kg) to 2 lbs (0.9 kg) of fibrefill per square foot (0.093 sq meters) of cushion surface area. For foam, you'll buy the appropriate density and thickness. Don't be shy – thicker is usually better for custom cushions!
- Loose Filling: If using loose fibrefill or foam pieces, fluff them up well before starting. Remove any clumps or imperfections.
- Pillow Formers: If using pre-made pillow formers, ensure they fit the shape and are the correct thickness. You might need to cut them slightly.
Step 4: Assembling the Cushion Cover
-
Method 1: Single Layer with Slit (Common for Rectangles):
- Place the main fabric piece right side up.
- Place the cut-out piece (with the slit) right side up on top, aligning the edges.
- Pin all edges securely.
- Sew around the edges, leaving the slit opening. Use a strong stitch (like a 10-stitch zigzag or straight stitch) and backstitch at the beginning and end for reinforcement. Trim the corners diagonally to make turning easier.
-
Method 2: Double Layer (Most Common):
- Place the two fabric pieces (front and back) right sides together.
- Pin the edges together.
- Sew around the edges, leaving an opening (usually 6-8 inches long) for turning. Again, use a strong stitch and backstitch.
- Turn the cover right side out through the opening. Push out the corners with an unsharpened pencil or the blunt end of a knitting needle to give it shape.
- Clip the excess fabric at the corners.
- Turn the cover completely right side out. Topstitch (sew very close to the edge, about 1/4 inch away) to enclose the raw edge and give a professional finish. Close the opening by hand with a slip stitch or machine stitch, or use a button or zipper.
-
Method 3: Using Pillow Formers: Simply sew the opening of the pillow former to the edges of your fabric pieces, following the manufacturer's instructions if it's a pre-stuffed one, or stuffing it first before sewing.

Step 5: Stuffing the Cushion
- Time for the Fun Part! This is where you bring the cushion to life.
- Prepare Your Stuffing Station: Lay out a drop cloth or old sheet. Have your stuffing tube ready with the filling. If using loose filling, wear old clothes you don't mind getting dusty.
- Stuff Firmly but Evenly: Insert the filling through the opening. Work systematically, filling the entire piece. For loose filling, use your hands to fluff it as you go. For foam, gently push it into the cover.
- Don't Forget the Edges: Make sure the filling is pushed up into the corners and along the edges for a full, even look and feel.
- Take Breaks: Stuffing can be back-breaking! Take breaks to stretch and move around.
Step 6: Closing the Cover
- Buttoned Cover: If you chose this method, insert the button through the buttonhole on the back of the cushion (the side facing the inside of the sofa). Make sure the button is securely attached.
- Zippered Cover: Machine-stitch the zipper to the opening edge from the inside of the cushion. Insert the zipper foot and stitch close to the zipper teeth. Then, from the outside, stitch the other side of the zipper opening. Hand-stitch the zipper to the cover or use a machine with a zipper foot, depending on the zipper type. Pull the zipper up.
- Slit Cover: Gently pull the filling through the slit opening. Smooth it out inside the cushion. Trim the slit opening neatly with small scissors or fabric shears, cutting at an angle to minimize the gap.
Step 7: Final Touches & Fluffing
- Press (Optional): Ironing can help remove any wrinkles and give the fabric a crisp finish, especially for fabrics that respond well to heat. Always check the fabric care label first!
- Fluff & Plump: Give the cushion a good shake and pat it down to distribute the filling evenly. Sit on it! Test the comfort level and thickness.
- Enjoy: Now you have a custom-made, thick, comfortable cushion ready to transform your sofa!
Caring for Your Custom Cushions
Your hard work deserves proper care to last. How you care depends heavily on the fabric you chose:
- Machine Washable Fabrics: Check the label! If safe, wash with similar colours in a mesh laundry bag to protect the filling. Use a gentle cycle and low spin. Tumble dry on low heat, removing the cushion occasionally to poke the filling and prevent clumping. Add a tennis shoe or two to help fluff fibrefill.
- Dry Clean Only Fabrics: Take to a professional cleaner experienced with upholstery or custom cushions.
- Spot Cleaning: For minor spills, dab with a clean, white cloth using a mild detergent solution (test an inconspicuous area first). Blot, don't rub.
- Regular Fluffing: Give your cushions a good shake and pat them down weekly or as needed to maintain their shape and softness.
The Advantage: Partnering with a Quality Upholstery Supplier
While DIY is fantastic, sometimes sourcing high-quality materials is easier by partnering with a reliable supplier. Companies like Jia Yu Textile Factory specialize in providing durable fabrics and fillings for upholstery projects, including custom cushions.
Jia Yu Textile Factory offers several key advantages for those looking to source materials or even commission custom cushions:
- Quality Materials: They provide a wide range of high-quality fabrics known for durability and aesthetic appeal, suitable for long-lasting cushions.
- Customization Options: Whether you need specific fabric colors, textures, or even custom-dyed fabrics, Jia Yu can often accommodate your requests.
- Reliable Service: Experience with textile manufacturing means they understand the needs of upholstery and cushion makers, offering dependable service and quality control.
- Expertise: They can offer guidance on material selection and potentially even manufacturing processes if you're looking to scale up or need professional production.
Final Thoughts: Your Cozy Creation Awaits
Making your own custom thick sofa cushions is a rewarding project that can significantly enhance your living space. It allows you to express your personal style and ensure maximum comfort. While it requires some planning and effort, the results are often unbeatable. Remember to choose quality materials, pay attention to measurements, and take your time with the sewing and stuffing. Don't be afraid to experiment with different fabrics and fillings to find the perfect combination for your cozy corner. Happy crafting!
Expanded Knowledge:
大家好,今天我们来聊聊如何通过佳羽纺织厂定制厚沙发垫子,沙发垫子作为家居装饰的一部分,其制作过程不仅需要专业的工艺和材料,还需要考虑到舒适度、耐用性和美观度等多方面因素,下面我们将详细介绍定制厚沙发垫子的过程。
II. 产品制作流程说明
-
材料选择
在制作沙发垫子时,首先需要选择合适的材料,常见的材料包括柔软的棉质、毛绒、皮革等,根据需求和预算,选择适合的材质。
-
设计规划
根据沙发的大小和形状,进行设计规划,考虑沙发垫子的尺寸、形状、图案和颜色等元素。
-
手工制作
手工制作是整个制作过程的核心环节,首先进行布料裁剪,然后进行缝制、填充和装饰等工序,在缝制过程中,需要注意细节处理,确保沙发垫子既美观又舒适。
-
质量检测
在制作过程中,需要进行质量检测,确保沙发垫子的质量和性能符合要求,这包括尺寸检测、外观检测、耐用性检测等。

III. 产品优势介绍
佳羽纺织厂在定制厚沙发垫子方面具有以下优势:
产品优势一:优质材料选择
我们选用高质量的材料,确保沙发垫子既舒适又耐用,无论是柔软的棉质还是毛绒,都能提供良好的触感和保暖性。
产品优势二:个性化定制服务
我们提供个性化的定制服务,可以根据客户的需求和喜好进行设计,满足不同客户的需求,我们还可以根据沙发的大小和形状进行精确裁剪,确保沙发垫子与沙发完美贴合。
产品优势三:精湛工艺和精湛技术
我们的工艺和技术都非常精湛,能够确保沙发垫子在制作过程中细节处理得当,美观舒适,我们注重环保和可持续性,选用环保材料,符合现代家居装饰的要求。
IV. 案例说明
以佳羽纺织厂为例,他们是如何进行定制厚沙发垫子的呢?下面是一个具体的案例:
客户需求分析
某客户需要一款厚实的沙发垫子,用于装饰家居,同时考虑舒适度和耐用性,经过与客户的沟通,我们选择了优质的毛绒材料进行制作,经过精心设计和手工制作,最终制作出一款既美观又舒适的沙发垫子,客户对产品质量非常满意。
V. 问答环节(问答式补充说明)
Q1:在定制沙发垫子时,需要注意哪些方面? A1:在定制沙发垫子时,需要注意材料选择、设计规划、细节处理和质量检测等方面,还需要考虑到产品的舒适度、耐用性和美观度等多方面因素。 Q2:佳羽纺织厂在定制厚沙发垫子方面的优势是什么? A2:佳羽纺织厂在定制厚沙发垫子方面具有优质材料选择、个性化定制服务、精湛工艺和精湛技术等优势,我们还注重环保和可持续性,选用环保材料。 Q3:如何保证产品质量? A3:我们注重质量检测,确保产品质量符合要求,我们选用高质量的材料和精湛的工艺技术,确保产品质量和性能符合客户的需求和喜好。