tle:Crafting Custom-Fit Sheets for Students
is study explores the creation of custom-fit sheets for students, focusing on the design and development process. The research aims to provide a comprehensive understanding of the challenges faced during the production of these specialized educational materials. The study highlights the importance of considering factors such as student needs, material selection, and manufacturing processes in order to create effective and durable sheets. The findings suggest that by incorporating user feedback and conducting thorough testing, manufacturers can improve the quality and effectiveness of their products. Overall, this research provides valuable insights into the design and development of custom-fit sheets for students, offering practical recommendations for
Introduction: In the realm of textiles, where every thread is a story, one that speaks to the heart of students and their needs. At Jiayu Textile Factory, we understand the significance of providing not just a product but a piece of comfort that resonates with the spirit of youth. Our custom-fit sheets are designed to cater to the unique preferences of our student customers, ensuring they find the perfect blend of warmth and style. In this essay, we delve into the process of making these coveted bedding items, highlighting the advantages of our products, and sharing an inspiring case study to illustrate our commitment to quality and customer satisfaction.
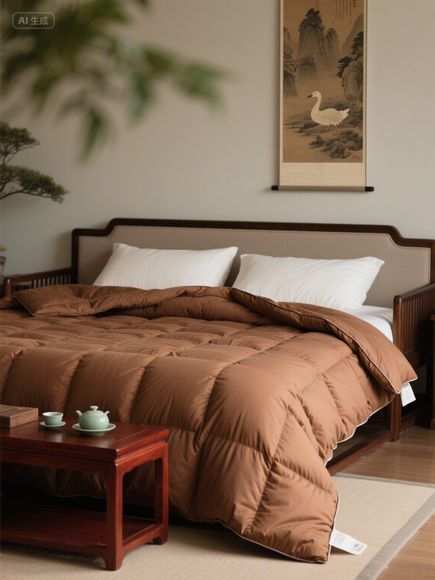
Product Description: At Jiayu Textile Factory, we craft our custom-fit sheets with utmost precision and attention to detail. Each sheet is meticulously measured and tailored to fit the contours of your body, ensuring maximum comfort and support. The fabric used in our sheets is soft, breathable, and hypoallergenic, making them ideal for those who prefer a gentle touch on their skin.
Our sheets are available in a variety of colors and patterns, allowing you to choose the aesthetic that best suits your taste. From classic white and blue to vibrant hues like pink and green, there's a design that will complement any room decor. Moreover, our sheets come in sizes ranging from Twin to California King, catering to the needs of even the largest of students.

Benefits of Our Products: At Jiayu Textile Factory, we believe in providing our customers with more than just a bedsheet. We offer a range of benefits that make our custom-fit sheets stand out from the rest.
Firstly, our sheets are made from high-quality materials that are both durable and long-lasting. They can withstand regular washing without losing their shape or color, ensuring that they remain fresh and comfortable for years to come.
Secondly, our sheets are designed to provide excellent support for your back, neck, and shoulders. The extra padding ensures that you wake up feeling refreshed and energized every morning.
Thirdly, our sheets are machine washable, making them easy to maintain and care for. Simply follow the instructions provided with your order and you can keep your sheets looking their best for many years to come.
Fourthly, our sheets are designed to conform to your body shape, ensuring that they never slip or bunch up during sleep. This helps to reduce the risk of discomfort and improves the overall quality of your sleep.
Finally, our sheets are made with love and care, using only the finest ingredients and techniques. We take pride in every step of the production process and ensure that our customers receive only the highest quality products.
Case Study: At Jiayu Textile Factory, we have a customer who has been with us for over a decade. This customer has been a loyal customer since day one, and we are proud to say that they have always been satisfied with our custom-fit sheets.
One particular instance stands out in our memory. Our customer had recently moved into a new apartment and needed a set of sheets that would fit their new space perfectly. They approached us with their specifications and requirements, and we were happy to assist them in creating a custom-fit sheet set that met all their needs.
We measured their body dimensions carefully and then ordered the appropriate fabric and pattern. Once the sheets arrived, they were delivered to their doorstep, and they were thrilled to see how well they fit their new space.

Over the years, our customer has continued to rely on our custom-fit sheets for their daily needs, and we continue to be grateful for their trust in us. We believe that our commitment to providing exceptional products and exceptional service has helped us build a strong relationship with our customers, and we look forward to continuing that journey for many years to come.
Conclusion: In conclusion, at Jiayu Textile Factory, we understand the importance of providing our students with high-quality custom-fit sheets that meet their unique needs. Our products are crafted with love and care, using only the finest materials and techniques, ensuring that they provide unparalleled comfort and support for our customers.
Whether you need a set of sheets for your dorm room or a set for your bedroom, we have got you covered. Our custom-fit sheets are designed to cater to your body shape, ensuring that you wake up feeling refreshed and energized every morning. So why wait? Order your custom-fit sheets today and experience the difference for yourself
Expanded Knowledge:
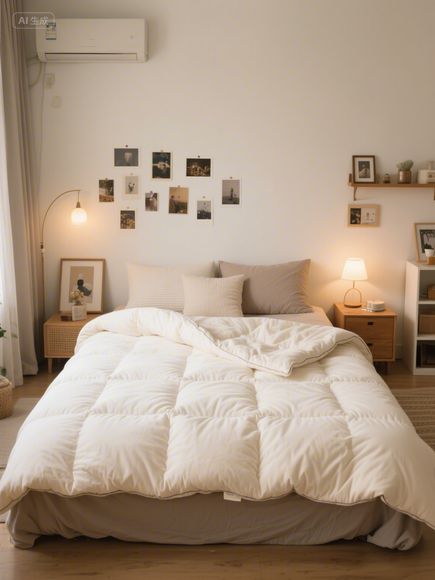
Hey everyone! Ever wanted a cozy, personalized blanket that's just your style? Maybe you're tired of the generic dorm blankets or want something extra special for your cozy reading nook. Well, making your own custom blanket can be a fun, rewarding project, especially if you're a student looking to save money and add a personal touch to your space. This guide will walk you through the basics of how to make a simple custom blanket, from choosing materials to finishing touches.
Materials You'll Need:
Before you start, gather all the supplies you'll need. Here's a quick reference table:
| Supply | Purpose | Recommendation |
|---|---|---|
| Fabric | Base material for the blanket | Flannel for warmth, cotton for breathability, bamboo for softness |
| Filling | Provides warmth and fluffiness | Polyester fiberfill (affordable and easy to use), down feathers (luxurious but more expensive) |
| Needle | For hand quilting or sewing | A quilting needle or a standard sewing needle with a large eye |
| Scissors | For cutting fabric and filling | Sharp fabric shears for clean cuts |
| Measuring Tape | Ensures accurate dimensions | Flexible tape measure for precise measurements |
| Pins | Secures fabric layers while sewing | Safety pins or quilting pins |
| Batting | Layer between fabric layers for insulation | Polyester batting or cotton batting |
| Iron | Removes wrinkles and finishes edges | Steam iron with a pressing cloth |
Step-by-Step Guide:
-
Choose Your Design and Size:

- Design: Do you want a simple solid color, a fun print, or something more intricate like a pattern or appliqué? As a student, starting simple is often best. Solid colors are easier and more budget-friendly.
- Size: Measure the space where you'll use the blanket. A small lap blanket might be 30x40 inches, while a throw blanket could be 50x60 inches. Keep in mind the amount of fabric and filling you'll need.
-
Select Your Fabrics:
- Outer Layers: Choose two pieces of fabric (the same size as your desired finished blanket). You can use solid colors or coordinate prints. Consider the feel: Flannel is soft and warm, perfect for winter. Cotton is breathable and good for year-round use. Bamboo or linen offer a silky texture.
- Binding: You'll need fabric strips (about 2.5 inches wide) to bind the edges. You can use a coordinating print or a contrasting solid.
-
Prepare the Fabric:
- Cut your main fabric pieces to the desired size, adding a few inches (e.g., 4-6 inches) to each side for seam allowance and binding.
- Cut the filling to fit the blanket size, slightly larger than the main fabric pieces.
- Cut the batting to the same size as your main fabric pieces. Batting adds insulation and helps with the quilt's drape.
- Cut the binding strips from your chosen fabric.
-
Layer the Blanket:
- Place your two main fabric pieces right-side-together. Smooth out any wrinkles.
- Layer the batting on top of one of the main fabric pieces.
- Place the second main fabric piece on top of the batting, right-side-out. You now have three layers: top fabric, batting, bottom fabric (all with the "right" sides facing each other).
-
Quilt or Sew:
- Hand Quilting: This is great for beginners. Pin the layers together along the edges and maybe in a grid pattern across the surface. Then, stitch through all three layers, pulling the stitches tight. This creates a "quilted" effect.
- Machine Quilting/Sewing: If you have a sewing machine, you can stitch in the ditch (along the edges of the top fabric) or use a decorative stitch. This is faster but requires basic machine sewing skills. You don't necessarily need to stitch through the batting if you're just creating a "filled" blanket rather than a traditional quilt.
-
Fill with Filling:
- Once the layers are secured (by pinning or sewing), turn the entire assembly right-side-out. You'll now have the "wrong" side facing up.
- Fill the blanket with your chosen filling, working it evenly into the layers. Use your hands to fluff and smooth it out as you go. Don't pack it too tightly; you want it to be soft and cozy. Fill until the desired thickness is reached.
-
Finish the Edges:
- Binding: This is the most common way to finish a quilt edge. Fold the binding strip in half lengthwise and press it. Then, align the raw edge of the binding with the raw edge of your quilt, pinning it in place. Hand stitch or machine stitch the binding to the edge, folding it over as you go to cover the raw edge.
- Serging: If you have a serger machine, this is a great way to finish the edges neatly and prevent fraying.
Tips for Students:
- Start Simple: Your first project doesn't need to be complex. A simple filled blanket is a great starting point.
- Use What You Have: Check thrift stores, fabric shops (even discount ones), or ask friends and family if they have extra fabric or batting you can use.
- Safety First: If using a sewing machine, always follow the manufacturer's instructions. Keep fingers clear of the needle.
- Be Patient: Hand quilting takes time and effort. Take breaks if you get tired.
- Measure Twice, Cut Once: Accuracy is key to a neat finish. Double-check your measurements before cutting fabric or filling.
Frequently Asked Questions (FAQ):
Q1: What's the easiest way for a student to make a custom blanket? A: The easiest way is usually a simple filled blanket using a sewing machine or even hand-stitching. Choose solid color fabrics, use polyester fiberfill (it's cheap and readily available), and keep the design minimal. If you have a sewing machine, machine quilting (stitching in the ditch) is faster than hand-quilting.

Q2: Do I need special fabric or filling? A: No, you don't necessarily need special materials. Good quality cotton or flannel works well for the outer fabric. Polyester fiberfill is the most common and affordable filling for DIY projects. Down feathers are luxurious but more expensive and require more careful handling. Bamboo or organic cotton can be used for a softer feel.
Q3: How much does it cost? A: Cost varies greatly depending on fabric choice, filling amount, size, and whether you machine quilt or hand-quilt. Expect to spend anywhere from $20-50 for basic supplies and materials for a small throw blanket, potentially more for higher quality fabrics or intricate quilting.
Case Study: Sarah's Cozy Corner
Sarah is a college student living in the dorms. She was cold during the winter nights and tired of the scratchy, thin blanket provided. She decided to make her own custom throw blanket.
- Goal: A soft, warm, and stylish 50x60 inch throw blanket for her couch.
- Materials: She chose two pieces of soft, brushed flannel in a warm burgundy color, polyester batting, and polyester fiberfill. She used a sewing machine.
- Process: She measured and cut the fabric, layered them with batting, machine-stitched in the ditch, filled it evenly with fiberfill, and finished the edges with binding.
- Result: Sarah now has a beautiful, warm, and uniquely hers blanket that fits perfectly on her couch. It cost her less than $30 and took her about 10 hours over a few weekends. She loves curling up with it during movie nights.
Conclusion:
Making your own custom blanket as a student is a fantastic way to learn a practical skill, create something truly personal, and save money. While it requires some time and effort, the end result is incredibly satisfying. Start with a simple project, gather your materials, and enjoy the process of creating your cozy haven. Happy crafting!